Edit
This article is about Edit mode. For the program used by edit mode, See: Goodblox Studio.
"Edit mode" is a feature in Goodblox Studio that allows you to edit all or most parts of a Place, without anything moving (sort-of like time has stopped). It offers lots of options to help you build and customize your place. Before you exit edit mode, it is recommended that you save what you were working on, to your computer.
Getting into Edit Mode
Edit mode can be reached using any of these three ways:
- By clicking edit on an un-copylocked place.
- By opening a place that is saved to your computer.
- By going to File> New. This opens a blank map (place) that can be turned into near anything you want.
- Note: Solo Mode is not the same as Edit mode.
The Explorer and Properties Bar
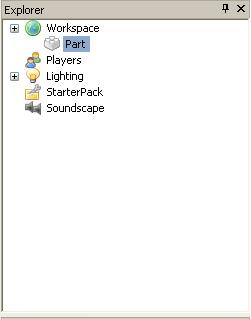
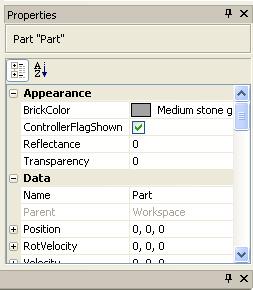
Once you're in edit mode (either in a new place, or currently built one), on the right side of Goodblox Studio, there are two tabs labeled "Explorer" and "Properties". If you do not see both of them, do not see all of them, or see none of them, goto "View" and select either Explorer or Properties (depending on which one you're missing.).
- Explorer
- This tab will show you the hierarchy (or upper part) of your Goodblox place. It shows the Workspace, Lighting, StarterPack, Players, and Sound services. Simply click the small "plus" to the left of each service to view what each service contains. All objects that you see in your place will be inside the Workspace. If an object contains other objects, it will have a small plus as well. Once you've hit each plus, it will turn into a "minus" sign. Click it to hide the objects.
- Properties
- This tab shows you a list of properties of an object. The object must be selected to view the properties of it.
- Note: This article will not go into detail about each of these services, or what they contain. Please click on each one to find more about it.
Working the Camera
The camera is simple to work. Unlike Solo mode and Online mode, the camera isn't restricted to one object (e.g. your head). Instead it's "free" allowing you to move it anywhere in any angle. Use either W, A, S, D, or the Arrow Keys near the bottom right of your keyboard to move the camera. Click and hold the right mouse button and move the mouse to look different ways.
Adding and Moving Objects
Adding Bricks, Scripts, and Models (as well as many other objects) into edit mode through Goodblox Studio is easy. Simply goto Insert> Object and select the thing you want to add to your place.
Moving is even easier:
There are two ways you can move solid object in Edit mode:
- By clicking and dragging it across a surface by moving your mouse.
- By selecting the Move on Axis tool near the top of screen.
"Insert" also has some other neat features too. You can insert Services, Decals, and even models you've saved to your computer.
- Note: Some objects, like sparkles and scripts, are not visible and therefore cannot be moved.
- Note: To select and object, simply click it with your mouse.
- Note: Don't get the Insert mentioned in this section, confused with the one in the next.
The "Insert" tab
See main article: Toolbox.
The Insert tab, is a tab that allows users to import models, music, and more that is created by other users into their Place. This "Insert" is simular to the drop-down menu, however it offers pre-made material and user created content.
To upload models from Edit mode and/or Solo Mode, right click any model/object, and select "Save to Roblox".
The Other tabs
In addition to the "Insert" tab, there is also...
- ...a Fullscreen tab. This puts the user in a larger view of the place by removing the taskbar and exit buttons from view. To exit, simply click it again.
- ...a Tools tab. This adds/removes the tools such as the area that contains the Drag tool from view.
- ...a Help tab. This brings a small window up that tells you some of the basic moves in Goodblox.
- Note: Some of these are avalible in Solo Mode and Online Mode.
Resizing Bricks
To resize bricks, click the Resize tool, select a brick, and 6 small blue dots should appear.(Four on the sides of the brick, one on the top and bottom of the brick.) Click one, then move your mouse to make the brick larger or smaller.
- Note: Each blue dot represents an axis. The top and bottom dots stretch a brick on its "Y" axis. The other four stretch/compress the brick on its "X" and/or "Z" axis.
- Note: You cannot resize models.
Though this section is small, new users may not know how to do such things.
Testing your place
This section will help you test your place, try it out in Solo mode, start servers and players all from your computer.
Testing
Once you're done with your place, or you want to see what something does before publishing it, press the small green arrow at the top of the screen to turn physics on, start scripts, and turn gravity on. This "starts" your place. If you want to restore your place to what it was before you tested it, click the small red arrow near the top of the screen where the "play" button was.
Visiting in Solo Mode
If you want your Character to visit your place from your computer, simply goto Tools> Test> Play Solo. This will allow you play inside your place and test it out yourself.
Starting Servers and Players
If you want to see what your place would be like in Online mode (so you will know what people see when they visit your place.), goto Tools> Test> Start Server. That imitates starting a server for everyone to visit. Want to have players there? Goto Tools> Test> Start Player. You can do this numerous times. Plus, you get to control each of the people you put into your place.
Saving/Publishing
When your done with your place in edit mode, save it to your computer by going to File> Save. Select an area to save to, and press the save button. Now, to save to ROBLOX, goto File> Publish. This will overwrite your current default place, with the one you were working on.

